Open Enrollment Process in New World ERP and eBenefits
Create events on the benefit categories in new world ERP Benefits Administration
- Navigate to Maintenance > Human Resources > Benefits Administration > Benefit Plan Maintenance.
- Drill into the applicable benefit category by clicking on the edit icon.
-
Click Create Event. Enter the Coverage Start Date and Payroll Start Date for the new benefit year:
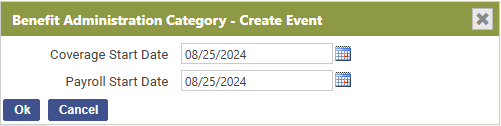
- Click OK.
- Update the Plan Year (this only applies to Benefit Categories that must impose annual limits, such as Deferred Comp and Pension).
- Click Save.
- If nothing has changed with the benefit plan, this step is complete. If rates, coverage options, etc., need to be updated, it may be done now.
Repeat Steps 2-6 for each benefit category that will be part of the open enrollment process.
Create an open enrollment batch in new world ERP
- Navigate to Human Resources > Benefits Administration > Benefits Open Enrollment.
- Click New to create the open enrollment batch.
Effective Date: The date used in this field will determine the categories that will be available. This date should be the Coverage Date that was used on the events created on the benefit categories in Benefits Administration. All categories with a Coverage Start Date on or after the Effective Date will appear.
Description: The description entered here will display on the Benefit Open Enrollment page.
No Enrollment Prior Year: This will determine the default for any employees who did not have a coverage option selected a category used in the open enrollment page.
No Selection means the employee will not have a selection and will require the user to select a coverage option, remove the employee from the batch or mark the employee as declined. This selection is recommended.
Declined means the employee will be defaulted to declined for the plans within this category and may be changed when necessary.
Benefit Categories: Select the benefit categories that should be part of the benefit batch by checking the box next to the desired category or selecting the box at the top of the grid to select all.
Benefit Groups: Select the benefit groups that are eligible for this benefit batch by moving them to the right multi-select list box.
-
Click Create Batch. You will receive a notification indicating that the batch is building in the background:
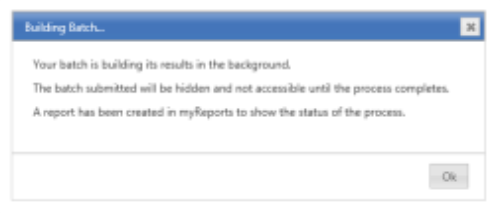
- Click OK.
While the batch is building, you may continue to use New World ERP. You may create multiple open enrollment batches if employees enroll at different times or if you want to keep benefit groups separate. Additionally, you may create individual batches for benefit plans that are not going to be part of the eBenefits Open Enrollment process.
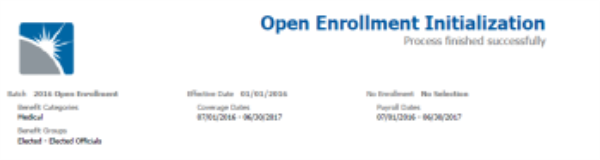
To check on the progress of the open enrollment batch creation, go to myReports. Once the report "Open Enrollment Initialization" is no longer green, the batch has been completed.
The completed Open Enrollment Initialization Report will provide a summary of the open enrollment batch:
Enable the batch in eBenefits
- Log into the eSuite Administration website.
- Navigate to eHR > eBenefits > Manage Benefit Batch.
-
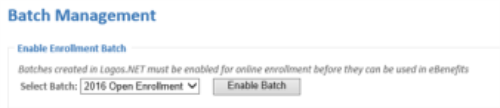
Select the benefit batch and click Enable Batch:
-
Enter the online enrollment period dates. The online open enrollment process will only be available to employees during this time. (Tip: Click the calendar icons to select the dates):
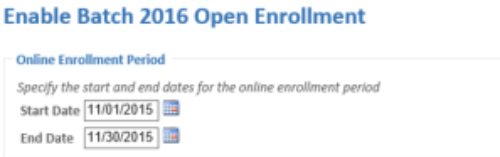
-
Check Enable for each category that should be available for online enrollment.
Tip: You do not have to enable every category. You may exclude certain categories from the online enrollment. Deferred compensation, pension and Benefit Credits categories are not eligible for online enrollment:
- Click Complete Batch Activation.
Manage the open enrollment batch in eBenefits
-
After the Batch has been activated, use the Manage Benefit Batch page (eHR > eBenefits > Manage Benefit Batch) to view the status of the enrollees, edit the batch or disable it:

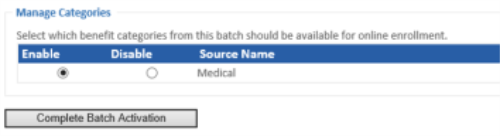
Under Enrollment Status, you will see the total number of employees included in the batch. They will be listed under Submitted or Unsubmitted, according to their current status.
-
Click the number under Enrollment Status, or click Status under Options, to view employee enrollment: You will see a list of the employees in the batch, sorted by benefit group. As they submit their enrollment, the Submitted Date column will update:
Tip: Once an employee submits the enrollment, he or she cannot make changes. However, you can reset the enrollment to reinstate access. After the employee has submitted, return to the Employee Enrollment Status and click Reset Enrollment (this button will be available only after the employee has submitted):

Click Edit under Options to update the Enrollment Period, or Enable/Disable Categories.
Click Disable under Options to disable the entire enrollment batch.
Manage the content for the open enrollment batch in eBenefits
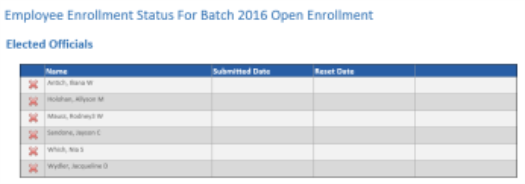
- Navigate to eHR > eBenefits > Content Configuration
- Select the appropriate benefit batch.
-
Select the Content Region. This determines which page in the open enrollment process the content will appear:
- Click Save after adding the desired message.
- Continue to select new content regions and add messages, as needed.
Validate and post the open enrollment batch in new world ERP
After the online enrollment period ends, and all employees have submitted their enrollment, return to new world ERP to complete the process and post the batch.
- Navigate to HR > Benefits Administration > Benefits Open Enrollment
-
Drill into the benefit batch by clicking on the description.
If you need to make any manual changes to your employees, because they could not complete their online open enrollment, made a mistake, forgot something, etc., this can be done here.
Tip: If an employee has a number greater than 0 under the No Selection column, it means they have not made an election on one or more benefit plans. Ensure that all employees have 0 under this column:
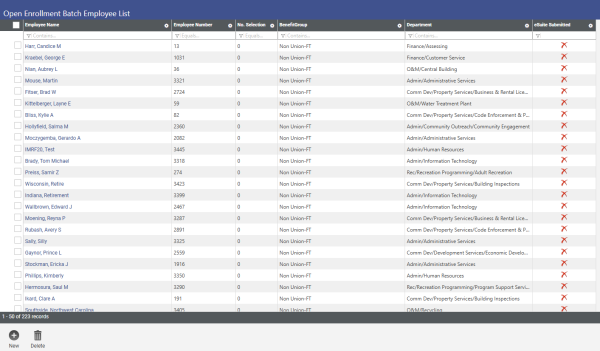
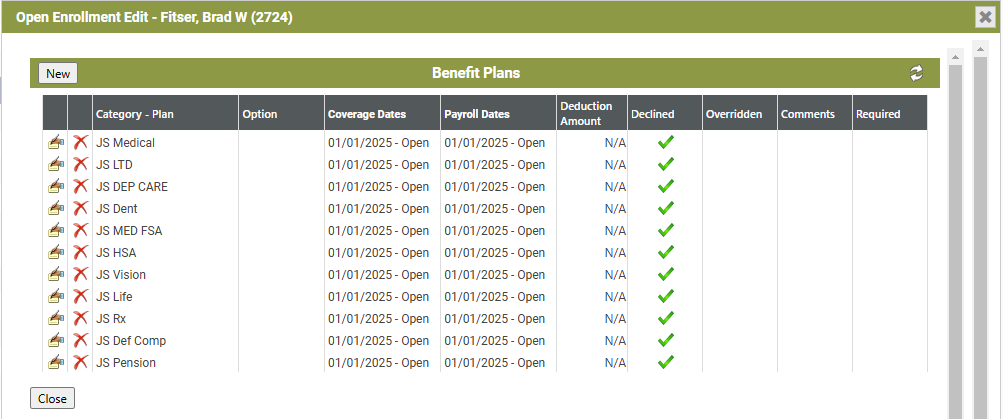
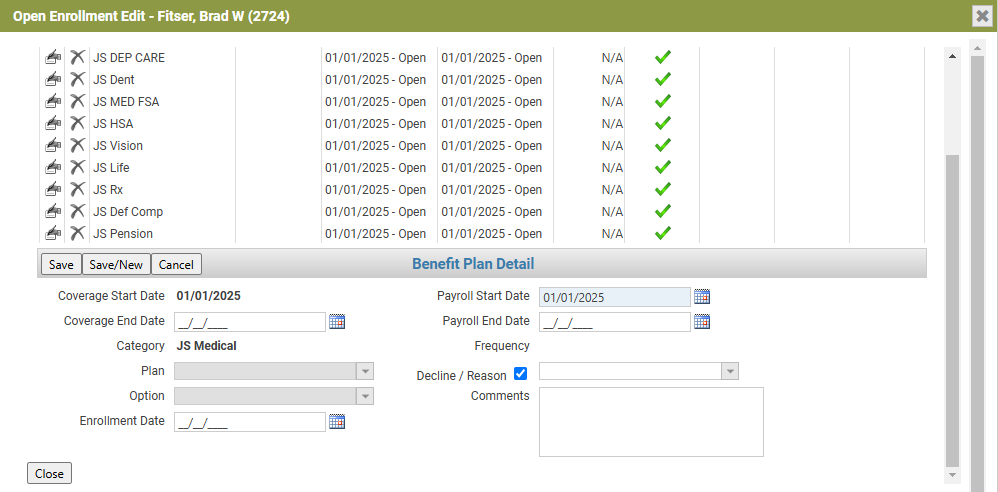
Click an employee's name to view their benefit detail:

Click the edit icon
 to expand the benefit plan detail and make the enrollment changes, if necessary:
For the employees to be updated in Workforce Administration, the batch must be validated, reviewed and posted.
Return to the Open Enrollment Batch list (use the breadcrumb in the upper right corner, if you are in the Open Enrollment Batch Employee List.
- Click the validation icon
 to navigate to the Open Enrollment Batch Validation. This will perform a system check to verify that all employees in the batch have a selection or have declined coverage for any eligible plans.
-
From the validation screen, select the open enrollment batch by selecting the box next to the batch description and clicking Submit. You will receive the following message:

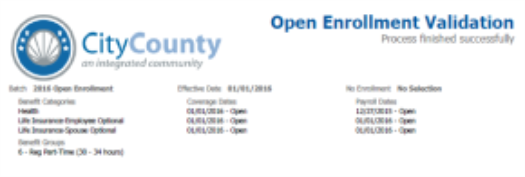
Once the validation is complete, the Open Enrollment Validation Report will provide a summary:
- Return to the Open Enrollment Batch Validation.
-
Click the listings icon
 to print the edit/error listings.
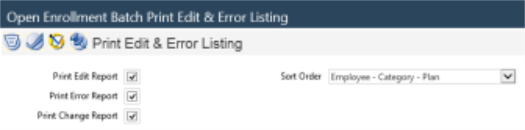
 Using the Show Output Preferences option in the top-right corner, you may determine which reports you want to print and the sort order of the edit listing:
- Select the box next to the batch description and click Submit.
-
Navigate to myReports to review the open enrollment results.
Open Enrollment Batch Error Listing
This report will list all errors and/or warnings associated with the employees' enrollment.
All errors must be corrected before moving forward. Warnings will not prevent you from posting the batch:

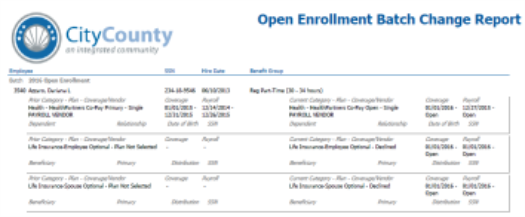
Open Enrollment Batch Change Report
This report will list all the employees who have made election changes that differ from last year:
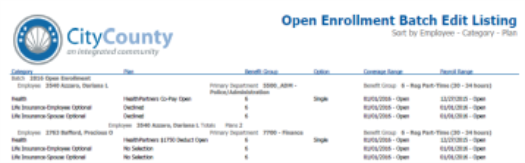
Open Enrollment Batch Edit Listing
This report lists all the employees in the batch and their respective elections:
- Return to the Open Enrollment Batch List.
-
To complete the final step in the open enrollment process, click the post icon
 to post the open enrollment batch.
Using the Show Output Preferences option in the top-right corner, you may determine which reports you want to print and the sort order of the edit listing:
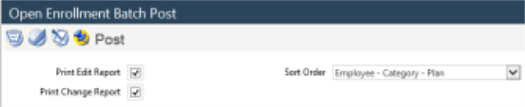
- Select the box next to the batch description and click Submit.
- Review the generated reports in myReports.